How to create a Team News Entry
This page provides instructions on how to add a Team News entry.
Step 1 – Log in ready to Edit Team Page
Follow the steps for How to log in to edit the Team Page so that you are on your Team Page ready to apply edits.
Step 2 – Click on “Add Row” to Team News Table
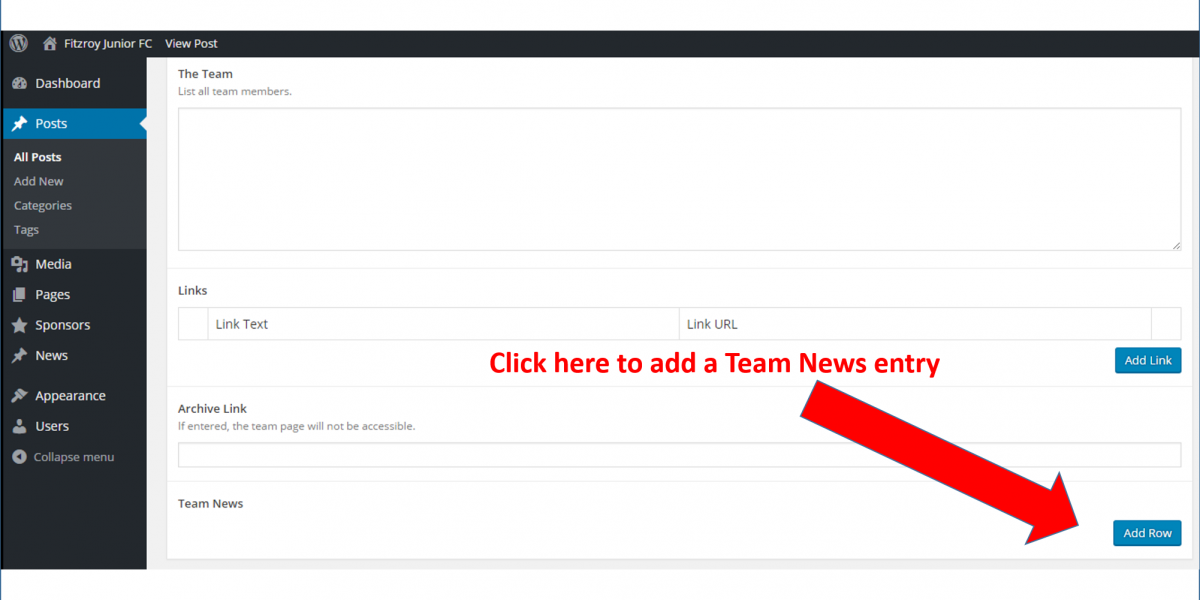
The Team News entries are managed in a table on the Team Page under the heading “Team News” towards the bottom of the page. To add the first news entry simply click on the “Add Row” button as shown in the image below. However, once the first row has been added (you will see the row number in the far left column of the table) then any additional rows should be added by clicking on the “+” sign in the far top right of the table. This will ensure that the new entry goes to the top of the table and allows entries to be presented on the page in reverse chronological sequence. Note that you may move rows around in the table by simply dragging the row from one position to another in the table.
Step 3 – Enter Team News Information
The table for each Team News entry has three fields that should be entered as follows:
- Title – a short title for the News Article. This might be something like “Match Report Round 1” or “Pie Night after Training Wed 24th May”
- Content – this may be text that can use the standard edit controls for Boldface fonts, Italics, Hyperlinks, Bullet point lists, Text justification etc. See Step 4 below if you wish to include any images in the body of the team news entry. No more than three images should be included in the body of each entry. See instructions for use of the Team Gallery for inclusion of more team photos. You can even create a link to a YouTube clip.
- Image – each article should attempt to have an image associated with it.
Note that for the creation of Team News/Match Reports, there are a set of guidelines that we would recommend that authors follow – please see Guidelines for Team News/Match Reports.
After entering the three fields for the Team News entry, it is recommended that you click on the “Update” button in the publishing controls on the right of the page. This will save your changes.
Step 4 – Upload Image (if not in Media Library already)
If you wish to include some images in the content of your News entry, click on the “Add Media” button, you will be offered a page that allows either selection of an existing image in the Media Library, or alternatively, you may upload a new image. If you are uploading a new image to the Media Library for use on your Team Page, select the “Upload Files” tab on the page as shown below:

You can then use “Select Files” to select the required image file from your computer. IMPORTANT – See Step 5 prior to loading up your Featured Image.
Step 5 – Name Your Image File on your Computer
VERY IMPORTANT
All images you load will become part of the FJFC Media Library – along with all other teams. While you will only be able to view images/files that you load to the Media Library, there is a single library that holds all team images/files. It is important that you load your file to the Media Library with the correct naming standard.
So – before you select your file to load to the Media Library, make sure your image file on your computer is named as follows:
<YYYY> <Team> R<x> <Short Text>
YYYY = the season, for example it would be 2017 for season 2017
Team = your standard team name as given on the Team Page, but without the division on the end, for example U10-3 or Colts-3 or U13 Girls
x = YJFL season round number, for example R1 for Round 1
Short Text = short (less than 20) character text describing photo, for example “Coach Address at 1Q” or “Ben kicking goal”
Some example image file names might be:
- 2017 U10-3 R1 Elias in action
- 2017 Colts-3 R1 Fred kicking goal
- 2017 U18 Girls R1 Josie tackle
Your image files should be JPG, PNG or any other standard image file format.
Now you can go to the Team Page Instructions and check out how to do other updates to your Team Page.